Saturday, September 20, 2014

Chalkboard Fonts & Tips to Make them look AWESOME in Photoshop


Here are the links to all the fonts - they should all be free for personal use, but may not be free for commercial use:

Appleberry
DK Crayon Crumble
Drawzing
Eraser
Kindergarten
Haven't Slept in Two Days
Janda Safe and Sound
Janda Stylish Script
Love Ya Like A Sister
Learning Curve BV
KG Like a Skyscraper
Milkmoustachio
Mossy
MTF Epic
Penelope Anne
Print Clearly
Promised Freedom
Purple Boxers
Return to Sender
Rockwell
Romantiques
Second Breakfast
She Paints Me Blue
Shelter Me
Soymilk
Stretching Up High
Sunshine in My Soul
Things We Said
Travel Diary
VintageOne
Waiting for the Sunrise

I use these fonts when I'm doing photography and I need to make it look like there was writing on a chalkboard. Here are a few examples:


You can see that in these images, the text doesn't look as perfect and bright white as the list image at the top of this post. Here's how I make it look more like a real chalk sign:

Step 1 - Pick a font and write text

Step 2 (optional) - Transform/rotate your text to match orientation of chalkboard (Ctl+T)

Step 3 - Pick a slightly off-white colour. Pure white is too bright & perfect.

Step 4 - Turn the layer opacity down to 50%

Step 5 - Make a copy of the text layer and open the layer style window. Select 'outer glow' and mess around with the opacity & size sliders until it looks how you want it.

Step 6 - Create a layer mask on each of the text layers, and with a soft brush, slowly remove some of the text so that it looks smudged or worn off.

Final Product!


Thursday, August 21, 2014

Room Sneak Peaks

We're starting to get all moved in and I am loving decorating every square in of this place! I will be doing feature posts on each room once they are complete, but in the meantime, here's a few previews of my favourite rooms so far!

Brynn's super girly room with a cloud raining hearts that I made out of foam. 

Tieran's Star Wars room & my attempt at a gallery wall

Our white kitchen with stainless steel farmhouse sink in the island. Moroccan stone tile backsplash just went in today & it isn't grouted yet, but I still love it!
Wainscotting & sconces on entry stairs

Foyer with the most amazing chandelier that cost more than all the other lights in the house combined!

Wednesday, August 13, 2014

A Place to Call Our Own

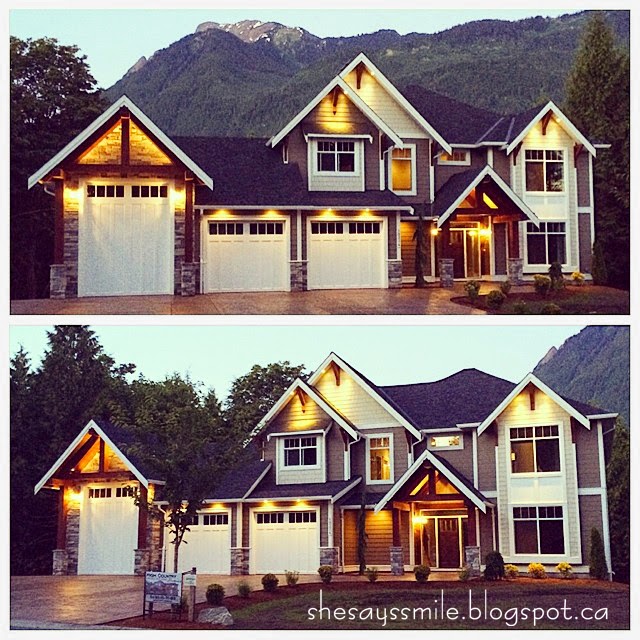
It's done!!!


I can't begin to express how happy we are that it's complete & we are able to move in. We are loving the house, the location, the space, the nature - everything!!

I will start to take some photos with my 'better' camera, and show off some of the rooms as we get things set up (I am loving the kids' rooms so far, so they will probably be first!). 

Hardiplank Siding Colours - Timber Bark & Cobblestone with Arctic White Trim.
Rockwork - Echo Ridge Country Ledgestone

Saturday, March 29, 2014

Building a Home - A Good Foundation

We took a family trip to Disneyland at the beginning of December (another post for another time), and this is what the footings looked like before we left.

Foundation Footings
 When we returned home a week later, we discovered that our home now looked like Stonehenge.

Stonehenge or Foundation Forms?
They had a bit of a delay since it was abnormally cold for a few weeks in December (living in the Lower Mainland of BC, we typically have a pretty mild & rainy winter), but finally, just before Christmas, the foundation was poured and we got our first look at how massive our home would be.

Foundation from the road (front)

Foundation from the back yard (rear)
Once the foundation was in, they put on the damp-proofing and backfilled the front - yep, another huge bill just for dirt.

Backfilled
Once it was backfilled and settled, they started to frame in the basement and put in the supports for the cement slab that was going to go in the garage area.

Cement Slab Supports
Ready for the Slab to be Poured
I know all these awesome photos of concrete are just absolutely riveting, so to add some design interest to this post, I will now reveal the colours of Hardie Plank fibre cement siding we decided on for the exterior of our home. 

After much deliberation, we came up with the following colour combination. I didn't want anything too harsh or overused, and we were also pretty limited by the developer as they had to approve our choices before we even submitted our application beforehand. 

Hardie Plank Siding Colours : Timber Bark (main), Cobblestone (shakers), Arctic White (trim)
Rockwork: Echo Ridge Country Ledgestone
Side note: As of this week, they have started putting up the siding. I'll keep you in suspense and make you wait for a future post before you get to see what it looks like on the actual house :)

Winter Family Activities - Ice Skating & Snowboarding

Every time Ty comes home for his week off, we try to spend as much time together as a family as possible. This usually involves a family outing of some kind, usually something simple like the movies or shopping. The last few times we tried to do something a little more active, namely snowboarding & skating.

 In January, our local mountain finally got a huge dump of snow and when I looked on their website, and it said they had lessons & equipment rentals for 2-4 year olds. Perfect. So we loaded up the car with all our winter clothes and headed up the scary winding road.

But, unless your 2-4 year old child had freakishly large feet - I'm talking big kid size 2 & up, whereas my kids are still in toddler 7 & 9 - they didn't have any equipment to rent. Really disappointing & misleading.

So we improvised and had a snowball fight before heading back down the mountain.
We had promised the kids snowboarding, but since that wasn't going to happen, we decided to try out ice skating. Obviously, we were determined to let our children experience some sort of winter sport before the week was through.

Brynn & Tieran's First Time Ice-Skating
They absolutely loved it. The local rink had a parent & tot block of time that was perfect - no older kids on the ice zooming around or playing hockey to worry about. It took a few tries, but with daddy's help and those handy metal walkers, we didn't have any big falls.

Fast-forward to February & Ty's next trip home. While working up north, he had come across a snowboard shop that was having a huge end-of-season sale on it's equipment. So, of course he picked up a set for the kiddos to share.

B modelling their new Burton set-up

As luck would have it, we got a HUGE dump of snow a couple of days later. So instead of dragging the kids back up the mountain, we got them all dressed up to play in the snow & groomed a run right on the driveway.

Tieran was an absolute natural. He barely fell, had great form, and was already attempting jumps & spins by the end of the day - not bad for a 4 year old.


Brynn was hilarious. Since she just turned 3, she didn't really understand the concept of looking down the hill until the very end, but she loved it just the same.


Check out my Instagram feed for more photos & videos of our skating & snowboarding adventures.

Monday, March 24, 2014

Building a Home - From the Ground Up

2013 was a CRAZY year for us.

We FINALLY sold our house in Kamloops and 'temporarily' moved in with my folks while we tried to find a place to live. Apparently, we are picker than most, and after looking at 50+ homes in the Fraser Valley, we came to the conclusion that the only way to get what we were looking for was to build it ourselves.

Luckily for us, during our house search we had come across the neighbourhood of our dreams. It had large, forested lots, was just the right distance from town, and in the catchment area for an amazing K-9 school. After second guessing ourselves a couple times, we finally chose one of the 1/2 acre lots in Rose Garden Estates with an amazing view of Mt. Cheam, located in the Rosedale/Popkum area between Chilliwack & Hope (and only 5-10 minutes from our home-towns of Agassiz & Harrison Hot Springs).

SOLD!
This was back in October 2013 & where our house building adventure began!

With a little bit of help from our real estate agent, asking around for advice, and my best friend Google, I figured out that the first steps to building a house are basically as follows:

1) Find a General Contractor  
2) Design the House
3) Hire Engineers
4) Apply for the Building Permit
5) Prep the Lot

The most stressful part of this whole process is that all of those things need to be figured out & completed all at once. You have to have #1-3 completed in order to do #4, and #5 can take a while and should really be started as soon as you have possession of the lot - unless you have to wait for the permit to clear trees, which we luckily did not. However, we did have to wait for the permit before we could move dirt around.

I would HIGHLY recommend finding your general contractor first, so he can help out with the entire design & application process - unfortunately, we didn't. Our amazing contractor, Rick, was basically the last person I personally hired in the process, so I ended up having to find everyone else from the excavators, tree fallers, plan designers, and engineers based solely on recommendations from friends, instead of hiring the contractor first and using who he would normally use and/or recommend. That would have been way easier.

Trees Cleared
Vegetation Cleared
This is where we had to wait for our building permit before we could start digging. I had an excellent drafter, Drew from Ausbridge Design, draw up our plans for us. Here's what we came up with:

Our Future Home!
While we were working on the plans, we hired a Geotechnical Engineer to determine site stability & other soil-related stuff. Once the plans were finalized, I also had to get a Structural Engineer to check them over and do up their drawings. Once the last few items on the application checklist were ready to go, including hiring our contractor, we submitted the permit application and patiently waited until it was finally approved a few weeks later!!

Moving Dirt Around
Adding Gravel
Did you happen to notice the giant hole in the second-to-last photo & the amount of gravel it took to fill that hole in the last image? This is how fast you can blow your budget. Seriously. It took over 150 loads of gravel to fill that hole (14 feet deep in the back), and considering it had to be engineered gravel for the footings to go on it, those loads were $150 a pop. That's on top of the $120/hr for each excavator. We spent more on dirt & gravel than on any other single item on the whole budget, other than the lot itself (including what it will cost for us to finish the entire basement). I'm a little bitter, and more than a little peeved that the original estimate was as far off as it was.

Whew. I forgot how exhausting and stressful that time was.

Check back soon for the next post - I'll be showing off the foundation (boring) & the exterior colour palette (yaay!).

Lauren

Friday, March 21, 2014

She Says Smile - Welcome

I figured that I had so much going on in my life, that it was time to add another thing to the pile. I have been blogging for a while, but for my photography business - www.brynnstone.com - and I feel I have so much more going on in my life that I wanted to share & document.


I recently moved back to my tiny hometown of Harrison Hot Springs, BC with my two little loves, Tieran (4) & Brynn (3). My 'husband', Ty (we have been together for 13 years, so we're married by default) works up north for the oil & gas industry three weeks a month, so we're doing the long-distance thing for now. To add to the stress, we are currently living with my parents in my childhood home while we build the home & studio of our dreams. It's great that we have live-in babysitters, but I'm REALLY ready for my own space again.

I do hope that I can make this page as interesting as possible. I will be including updates on our house construction, craft ideas, photography tips, and some opinions that not everyone will agree with - but I do love a good debate :)

Thanks for stopping by, I hope you visit again soon!

Lauren
xo